A Title-screen Menu is similar to the in-game Pause menu, only it's displayed in a specific scene, and invites the Player to click "New game" before continuing.
Just like our Pause menu, however, we still want to be able to access the Options, Load and Quit options, so we'll also need to add some logic to those menus in order to get them working with our new Title menu. This tutorial will assume that you already have a Pause menu with buttons for Options, Load and Quit beforehand - which will be the case when using the New Game Wizard unless you opted to create a blank interface.
Since our Title menu will be similar to the Pause menu, we'll copy it and use it as a basis. In the Menu Manager tab, click the cog button beside the Pause menu and click Copy.

The Paste menu button beneath the list of Menus will then become active. Click it to create a duplicate of the Pause Menu, and rename the new Menu from Pause (Copy) to Title.
We'll want this Menu to appear in a specific scene, so change it's Appear type to Manual. Clear the ActionList when turn on field, and make sure the Enabled on start? box is left unchecked.

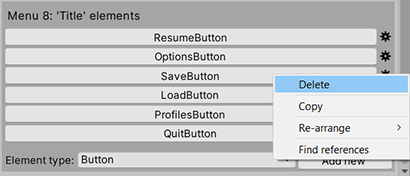
Since this Menu will be shown at the very start of our game, we have no need for a Save button. From the list of the Menu's elements, click the cog button beside SaveButton and choose Delete.
The Resume button needs to be changed to a New Game button, so click on the ResumeButton element, rename it to NewGameButton, and change it's Button text to New game. Finally, set it's Click type to Run Action List.
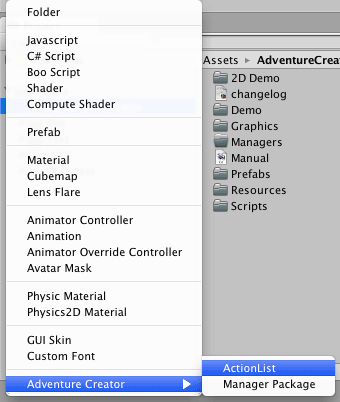
We need to give it an ActionList to run when clicked. Create a new folder in your game's folder, and name it MenuActionLists. Inside this folder, create a Menu ActionList by choosing Create → Adventure Creator → ActionList in the Project window.
Name this new asset Begin new game.
We'll use this ActionList to close the Title menu, and then load our game's opening scene. In the Inspector for this file, create a Menu: Change state Action. Enter Title into the Menu to turn off box, and set the Change type to Turn Off Menu.

Then add a Scene: Switch Action, and enter the scene number or name of your game's introduction scene. In this example, we're loading the scene named "Intro".

Back in our Title Menu, set NewGameButton's ActionList to run as this new ActionList.

When the Options or Load buttons are clicked, the appropriate menus will crossfade in. However, they are set to crossfade back to the Pause menu when turned off. We will need to change this behaviour, so that - when we are in our title-screen scene - we instead crossfade to our Title menu.
To do this, we can make use of Events, to block calls to turn on the Pause menu, and instead turn Title.
Assuming our Title menu is displayed in its own scene, add an empty GameObject and attach AC's Event Runner component. Use the popup field at the bottom to create a new Menu: Turn on event. By default, this will be run whenever any Menu is turned on:

We're only interested in the Pause menu being turned on - so type Pause into the Menu name field, then click the + icon underneath to create a new ActionList when trigger asset:

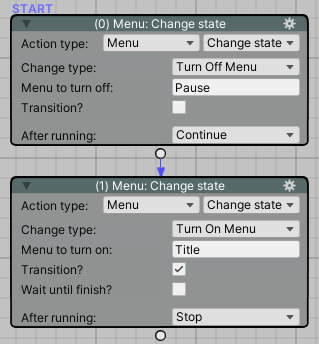
Open up this new ActionList asset, which will run when the Pause menu is turned on. We'll want to prevent this, and instead turn on the Title menu. We can do this with a pair of Menu: Change state Actions:
Protip: The Event Runner component will run events when placed in a specific scene. To run events game-wide, use the Events Editor, available in the top toolbar.
Now we are ready to display this Title menu in our scene. Create a new Cutscene set to run when the game begins by clicking Auto-create next to On start in the Scene Manager. Use another Menu: Change state Action to turn on the Title menu.
Note, however, that the Title menu is set to pause the game when enabled. This is best kept so because the same is true for the sub-menus (Options, Load etc). If we want to have background animation playing while this menu is displayed, we can just set any Animator's Update Mode to Unscaled Time.